From Novice to Contributor: A Beginner's Experience in Open-Source Development

As a tech enthusiast, I was always fascinated by open source and wanted to contribute to it. Contributing to open source can also lead to internship and job opportunities. For example, Google Summer of Code (GSoC) is an annual program that offers students stipends to work on open-source projects. Other programs like Outreachy and Open Source Fellowship also offer similar opportunities. Additionally, companies like Microsoft, Google, and Facebook often hire developers who have contributed to open source.
Contributing to open source can also allow you to work with big tech companies without any certifications. For example, Linux, Bootstrap, React, and many other popular open-source projects are sponsored by big tech companies. By contributing to these projects, you can gain visibility and recognition from these companies.
Exploring the open-source ecosystem and finding your first Issue
Finding the right project to start with was a challenge for me. I knew about GitHub and GitLab but had no idea where to find beginner-friendly projects. That's when I discovered websites like the good first issue.dev, First Timers Only, and CodeTriage which curate a list of projects with beginner-friendly issues. These websites made it easier for me to find a project and start contributing.
Starting Small: Why Easier Issues are Better for Beginners
Finding the first issue to contribute to can be a daunting task. As a beginner, it's important to start with easier issues that set the pace for future contributions and make you more familiar with the open-source contribution process. These issues may be labelled as "good first issues", "up for grabs" or "beginner friendly" and are often smaller in scope. By starting small, you can build up your confidence and skills before tackling more complex issues.
How to Find Issues to Contribute
One of the best places to find issues to contribute to is the "Issues" tab in the project's repository on GitHub. This tab lists all the open issues in the project, including feature requests, bugs, and other tasks that need to be completed. You can filter the issues by labels, such as "good first issue" or "beginner-friendly," to find issues that are suitable for beginners. It's important to read the issue description carefully and make sure you understand what is being asked before attempting to contribute.
Reading Documentation and Guidelines
Before making any contributions, it's important to read through the project's documentation, guidelines, and README file. These resources provide important information about the project's structure, coding standards, and contribution guidelines. It can be overwhelming to read through large codebases for the first time, but taking the time to understand the project's structure and architecture will make it easier to navigate and contribute to the codebase.
Setting Up Your Local Machine
Forking a Repository
Once I found a project that I wanted to contribute to, the next step was to fork the repository. Forking a repository creates a copy of the project in your own GitHub or GitLab account. This allows you to make changes to the code without affecting the original project.
To fork a repository, navigate to the repository on GitHub or GitLab and click the "Fork" button in the top right corner of the page. Once you've forked the repository, you'll have your copy of the project in your GitHub or GitLab account.

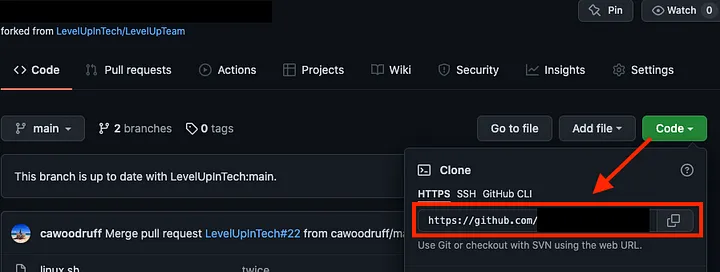
Cloning the Repository
After forking the repository, I cloned it to my local machine using the git clone command in the terminal. This downloaded a copy of the code to my local machine and allowed me to work on it locally.
# Cloning a repository to your local machine
# Replace <repository-url> with the HTTPS or SSH URL of the repository
git clone <repository-url>
Creating a New Branch
Before making any changes, I created a new branch using the git checkout -b command. This allowed me to work on a specific feature or fix it without affecting the main branch of the project.
# Creating a new branch for your changes
# Replace <new-branch-name> with a descriptive name for your branch
git checkout -b <new-branch-name>
Making Changes
With the code downloaded and my branch created, I started making changes to the code. Depending on the project, I had to install dependencies, set up a development environment, or read through the documentation before I could start making changes.
# Example code: Adding a function to a Python project
# Open the file you want to modify and add your changes
def new_function():
    print("Hello World!")
Committing Changes
After making changes, I committed them to my branch using the git commit command. I made sure to add a descriptive commit message that described what I had done.
# Committing your changes to your branch
# Replace "Your commit message here" with a descriptive message
git commit -m "Your commit message here"
Pushing Changes
Once I had committed my changes, I pushed them to my forked repository on GitHub or GitLab using the git push command. I uploaded my changes to the remote repository and made them available for review.
# Pushing your changes to your forked repository
# Replace <your-branch-name> with the name of your branch
git push origin <your-branch-name>
Creating a Pull Request
The final step was to create a pull request (PR) to the original repository. To do this, I navigated to my forked repository on GitHub or GitLab and clicked the "New pull request" button. I selected the branch I wanted to merge and added a detailed description of my changes.
Create a pull request to merge your changes into the original repository
Navigate to your forked repository on GitHub or GitLab and click "New pull request"

Submitting the pull request
On the GitHub dashboard click the pull requests tab and then click New Pull Request.
To finish just add your comments on your changes then click “Create pull request
Once you created the PR, you must wait for the project maintainers to review your changes and merge them to the original repository.
Pro Tip
Contributing to open source is a collaborative effort, and being patient and open to feedback is key to success. After submitting your changes, it's important to wait for the maintainers to thoroughly review them. Don't be surprised if you receive suggestions for improvement, and remember that not all contributions get merged. Instead of feeling discouraged, view it as an opportunity to learn and grow as a contributor. The developer community is incredibly helpful, so don't hesitate to ask for feedback and advice on how to improve your code. By leveraging the power of the community, you can continue to grow and improve your skills every day
Conclusion
Starting your open-source journey can be challenging, but it's also a rewarding experience. By contributing to open source, you can improve your coding skills, give back to the community, and even land an internship or job opportunity. With websites like the good first issue. Dev and programs like GSoC, finding a beginner-friendly project has even been easier. You just have to be patient throughout the journey and keep believing in yourself. So why not start today and join the open-source community?
